Description
How To Make A Wifi Robot Using NodeMCU
Introduction
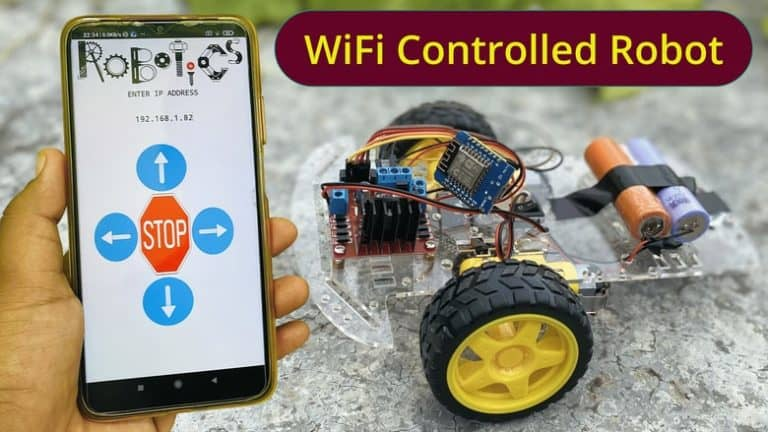
In This Tutorial, We going to make a WiFi Controller Car Using ESP8266. We just Control the Car With the help of a Mobile Application when We put the Forward button the robot Car Will go Forward Same As Backward, Right And Left.
We Have Described To Step by Step how to do this is your own just read the full article.
Bill Of Materials
These are All Component We Used in this Project
| S.N | Component | Quantity | Link To Buy |
| 1 | NodeMCU (Esp8266) | 1 | |
| 2 | L298N Motor Driver | 1 | |
| 3 | Bo Motor | 1 | |
| 4 | Bo Motor Wheels | 1 | |
| 5 | 12v Power Supply | 1 |
ESP8266
this wifi controlled robot is made using ESP8266 Chip As a control unit to control the Pair of Motors.
L298n Motor Driver
To Control the Pair Of motors, that’s why we used the L298n Motor Diver Module.
L298n Motor Diver Module Required Input Voltage is 12v Dc Power Supply And is Also Given The 5v Dc Output we used to power up your ESP8266 Module.
BO Motor
Here We used the Bo Motor And The RPM Of the Motor Is 150rpm.
BO Motor Wheels
Bo Motor Wheels
Circuit Diagram
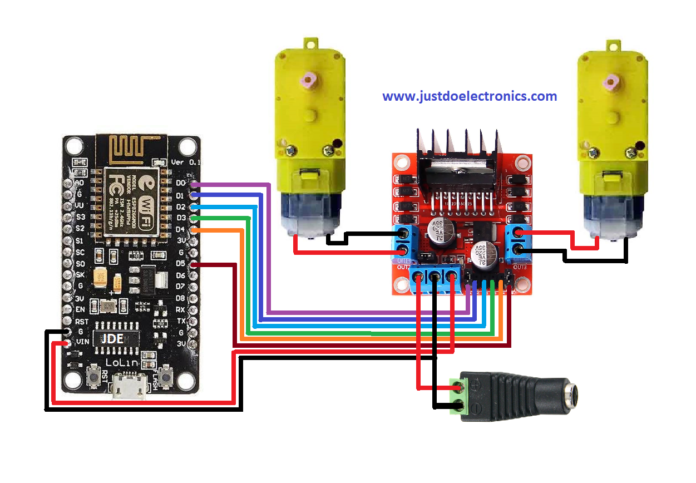
Here is the circuit Diagram For this wifi controller car using the ESP8266 Project. we will control the two dc motors via L298 Motor Driver Ic. I used the L298N Because the Motor Driver is a high-power Motor Driver Capable of running 5v to 35v Dc At a maximum of 25W.
You can Also Show the pic Connection Of ESP8266 And L298n Motor Driver
- ENA GPIO14(D5)
- ENA GPIO12(D6)
- IN_GPIO15(D8)
- IN_2 GPIO13(D7)
- IN_3 GPIO2(D4)
- Int_4 GPIO0(D3)
PCB Design
Now We Attach the Motor Driver Board And ESP8266 Board.
Source Code
First We complete the code and then select the correct board then upload it
now We Need To Change the SSID And Password
| 1
2 |
const char* ssid = “justdoelectronics”;
ESP8266WebServer server(80); |
| 1
2 3 4 5 6 7 8 9 10 11 12 13 14 15 16 17 18 19 20 21 22 23 24 25 26 27 28 29 30 31 32 33 34 35 36 37 38 39 40 41 42 43 44 45 46 47 48 49 50 51 52 53 54 55 56 57 58 59 60 61 62 63 64 65 66 67 68 69 70 71 72 73 74 75 76 77 78 79 80 81 82 83 84 85 86 87 88 89 90 91 92 93 94 95 96 97 98 99 100 101 102 103 104 105 106 107 108 109 110 111 112 113 114 115 116 117 118 119 120 121 122 123 124 125 126 127 128 129 130 131 132 133 134 135 136 137 138 139 140 141 142 143 144 145 146 147 148 149 150 151 152 153 154 155 156 157 158 159 160 161 162 163 164 165 166 167 168 169 170 171 172 173 174 175 176 177 |
#define ENA 14
#define ENB 12 #define IN_1 15 #define IN_2 13 #define IN_3 2 #define IN_4 0
#include <ESP8266WiFi.h> #include <WiFiClient.h> #include <ESP8266WebServer.h>
String command; int speedCar = 800; int speed_Coeff = 3;
const char* ssid = “justdoelectronics”; ESP8266WebServer server(80);
void setup() {
pinMode(ENA, OUTPUT); pinMode(ENB, OUTPUT); pinMode(IN_1, OUTPUT); pinMode(IN_2, OUTPUT); pinMode(IN_3, OUTPUT); pinMode(IN_4, OUTPUT);
Serial.begin(115200);
// Connecting WiFi
WiFi.mode(WIFI_AP); WiFi.softAP(ssid);
IPAddress myIP = WiFi.softAPIP(); Serial.print(“AP IP address: “); Serial.println(myIP);
// Starting WEB-server server.on(“/”, HTTP_handleRoot); server.onNotFound(HTTP_handleRoot); server.begin(); }
void goAhead() {
digitalWrite(IN_1, LOW); digitalWrite(IN_2, HIGH); analogWrite(ENA, speedCar);
digitalWrite(IN_3, LOW); digitalWrite(IN_4, HIGH); analogWrite(ENB, speedCar); }
void goBack() {
digitalWrite(IN_1, HIGH); digitalWrite(IN_2, LOW); analogWrite(ENA, speedCar);
digitalWrite(IN_3, HIGH); digitalWrite(IN_4, LOW); analogWrite(ENB, speedCar); }
void goRight() {
digitalWrite(IN_1, HIGH); digitalWrite(IN_2, LOW); analogWrite(ENA, speedCar);
digitalWrite(IN_3, LOW); digitalWrite(IN_4, HIGH); analogWrite(ENB, speedCar); }
void goLeft() {
digitalWrite(IN_1, LOW); digitalWrite(IN_2, HIGH); analogWrite(ENA, speedCar);
digitalWrite(IN_3, HIGH); digitalWrite(IN_4, LOW); analogWrite(ENB, speedCar); }
void goAheadRight() {
digitalWrite(IN_1, LOW); digitalWrite(IN_2, HIGH); analogWrite(ENA, speedCar / speed_Coeff);
digitalWrite(IN_3, LOW); digitalWrite(IN_4, HIGH); analogWrite(ENB, speedCar); }
void goAheadLeft() {
digitalWrite(IN_1, LOW); digitalWrite(IN_2, HIGH); analogWrite(ENA, speedCar);
digitalWrite(IN_3, LOW); digitalWrite(IN_4, HIGH); analogWrite(ENB, speedCar / speed_Coeff); }
void goBackRight() {
digitalWrite(IN_1, HIGH); digitalWrite(IN_2, LOW); analogWrite(ENA, speedCar / speed_Coeff);
digitalWrite(IN_3, HIGH); digitalWrite(IN_4, LOW); analogWrite(ENB, speedCar); }
void goBackLeft() {
digitalWrite(IN_1, HIGH); digitalWrite(IN_2, LOW); analogWrite(ENA, speedCar);
digitalWrite(IN_3, HIGH); digitalWrite(IN_4, LOW); analogWrite(ENB, speedCar / speed_Coeff); }
void stopRobot() {
digitalWrite(IN_1, LOW); digitalWrite(IN_2, LOW); analogWrite(ENA, speedCar);
digitalWrite(IN_3, LOW); digitalWrite(IN_4, LOW); analogWrite(ENB, speedCar); }
void loop() { server.handleClient();
command = server.arg(“State”); if (command == “F”) goAhead(); else if (command == “B”) goBack(); else if (command == “L”) goLeft(); else if (command == “R”) goRight(); else if (command == “I”) goAheadRight(); else if (command == “G”) goAheadLeft(); else if (command == “J”) goBackRight(); else if (command == “H”) goBackLeft(); else if (command == “0”) speedCar = 400; else if (command == “1”) speedCar = 470; else if (command == “2”) speedCar = 540; else if (command == “3”) speedCar = 610; else if (command == “4”) speedCar = 680; else if (command == “5”) speedCar = 750; else if (command == “6”) speedCar = 820; else if (command == “7”) speedCar = 890; else if (command == “8”) speedCar = 960; else if (command == “9”) speedCar = 1023; else if (command == “S”) stopRobot(); }
void HTTP_handleRoot(void) {
if (server.hasArg(“State”)) { Serial.println(server.arg(“State”)); } server.send(200, “text/html”, “”); delay(1);
} |
After uploading the code open the android app installed on your phone and connect with Wi-Fi Now You can control the Car. to move the robot in the forward direction and when you press the up arrow to move it Backward, Press the Down Arrow key. Similarly to moving the car left and right Direction.


Reviews
There are no reviews yet.